To get started using our API, first generate your API key. To do that, in your admin dashboard click on "Generate API key" link on the right. Then you'll need to call the GetApiToken method with your API key to get your temporary authentication token. All subsequent method call to our API needs to include your authentication token in the “Authentication” Request Header.
Make sure you've looked through the Terminology and Overview section to better understand the terms we use, our basic data structure and processes on a high level.
Below are a few examples (use cases) you may find helpful.
Example 1. Creating a Premium account
In this example we will create a Premium (multi-user) account. Note: by default your account may not have the ability to create Premium accounts via the API. Please contact our support for details.Step one: call "GET /accountplans/{accountid}?accounttype={accounttype}" method with accountype=Premium and get the list of avaliable Premium account plans:
Sample response:
{
  "Data": [
    {
      "Id": 1,
      "Type": "Premium",
      "Name": "Plan1",
      "Description": "A multi-site plan",
      "PremiumAccountPlanInfo": {
        "SitesLimit": 3,
        "AdminsLimit": 1,
        "SubAccountsLimit": -1
      }
    },
    {
      "Id": 2,
      "Type": "Premium",
      "Name": "Plan2",
      "Description": "A multi-site plan with customer branding",
      "PremiumAccountPlanInfo": {
        "SitesLimit": 10,
        "AdminsLimit": 1,
        "SubAccountsLimit": -1
      }
    }
  ],
  "Success": true,
  "Messages": []
}
Step two: select the needed plan id ("AccountPlanId") and call "PUT /accounts/" method including the plan id in the "AccountPlanId" parameter.
Sample request:
{
  "ExternalId": "externalid",
  "Type": "Premium",
  "AccountPlanId": 1,
  "FirstName": "Bill",
  "LastName": "Smith",
  "Email": "billsmith@somedomain.com",
  "Password": "somepassword",
  "PremiumAccountInfo": {
    "CompanyShortName": "XYZ",
    "CompanyFullName": "XYZ Enterprises Inc",
    "MobileDomain": "xyz.mobi",
    "ControlPanelDomains": "admin.xyz.mobi"
  }
}
Sample response:
{
  "Data": {
    "AccountId": "fa516117-9d6a-4eb0-b5c1-0ca80db618c4",
    "ExternalId": "externalid",
    "Type": "Premium",
    "AccountPlanId": 1,
    "Status": "Active",
    "FirstName": "Bill",
  "LastName": "Smith",
  "Email": "billsmith@somedomain.com",
  "PremiumAccountInfo": {
    "CompanyShortName": "XYZ",
    "CompanyFullName": "XYZ Enterprises Inc",
    "MobileDomain": "xyz.mobi",
    "ControlPanelDomains": "admin.xyz.mobi"
    }
  },
  "Success": true,
  "Messages": []
}
The property "AccountId" is the identifier of the Premium account.
Example 2. Create a Basic account in a Premium account
In this example we will create a Basic (single-user) account in a Premium account.Step one: call "GET /accountplans/{accountid}?accounttype={accounttype}" with accountype=Basic to get a list of Basic plans. If you have the ability to create Premium accounts, you would also need to specify the "accountid" parameter of the Premium account to get a list of plans on that Premium account.
Sample response:
{
  "Data": [
    {
      "Id": 1,
      "Type": "Basic",
      "Name": "Website",
      "Description": "A website plan",
      "BasicAccountPlanInfo": {
        "PagesLimit": 3,
        "SitesLimit": 1
      }
    },
    {
      "Id": 2,
      "Type": "Basic",
      "Name": "Website with Loyalty",
      "Description": "A website plan that can include a loyalty program",
      "BasicAccountPlanInfo": {
        "PagesLimit": 10,
        "SitesLimit": 1
      }
    }
  ],
  "Success": true,
  "Messages": []
}
Step two: select the needed plan id ("AccountPlanId") and call "PUT /accounts/" method including the plan id in AccountPlanId parameter. If you have the ability to create Premium accounts, you would also need to specify the id of the Premium account in "ParentAccountId" parameter.
Sample request:
{
  "ExternalId": "externalid",
  "Type": "Basic",
  "AccountPlanId": 1,
  "ParentAccountId": "0f0f72c9-c216-41aa-841e-e096fc741f6f",
  "FirstName": "Bill",
  "LastName": "Smith",
  "Email": "bilsmith@somedomain.com",
  "Password": "somepassword"
}
Sample response:
{
  "Data": {
    "AccountId": "073f4072-9870-438d-818b-c7e56eff2601",
    "ExternalId": "externalid",
    "Type": "Basic",
    "AccountPlanId": 1,
    "Status": "Active",
    "ParentAccountId": "0f0f72c9-c216-41aa-841e-e096fc741f6f",
    "FirstName": "Bill",
    "LastName": "Smith",
    "Email": "bilsmith@somedomain.com"
  },
  "Success": true,
  "Messages": []
}
The property "AccountId" is the identifier of the Basic account.
Example 3. Deactivate a Basic account
Call "POST /accounts/{accountid}/changeaccountstatus/{status}" method with status=disabled and the needed "accountid" parameter.
Sample response:
{
  "Data": true,
  "Success": true,
  "Messages": []
}
Example 4. Generate multiple pages via the API
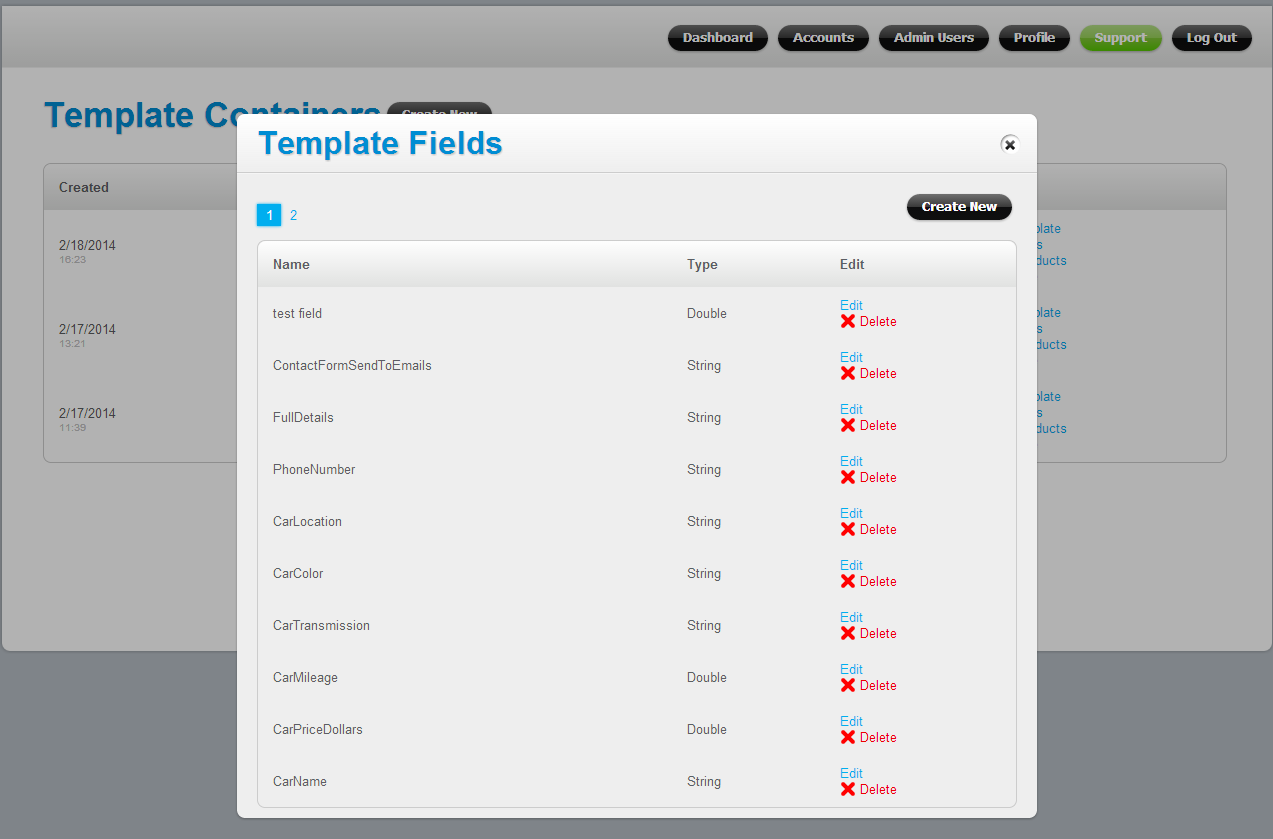
This example explains how to generate multiple pages (based on an API Page Template and a Data Container) in an existing account. For this example the following Data Container and Page Template first need to be manually created in a Premium account:
Data Container:
API Page Template:
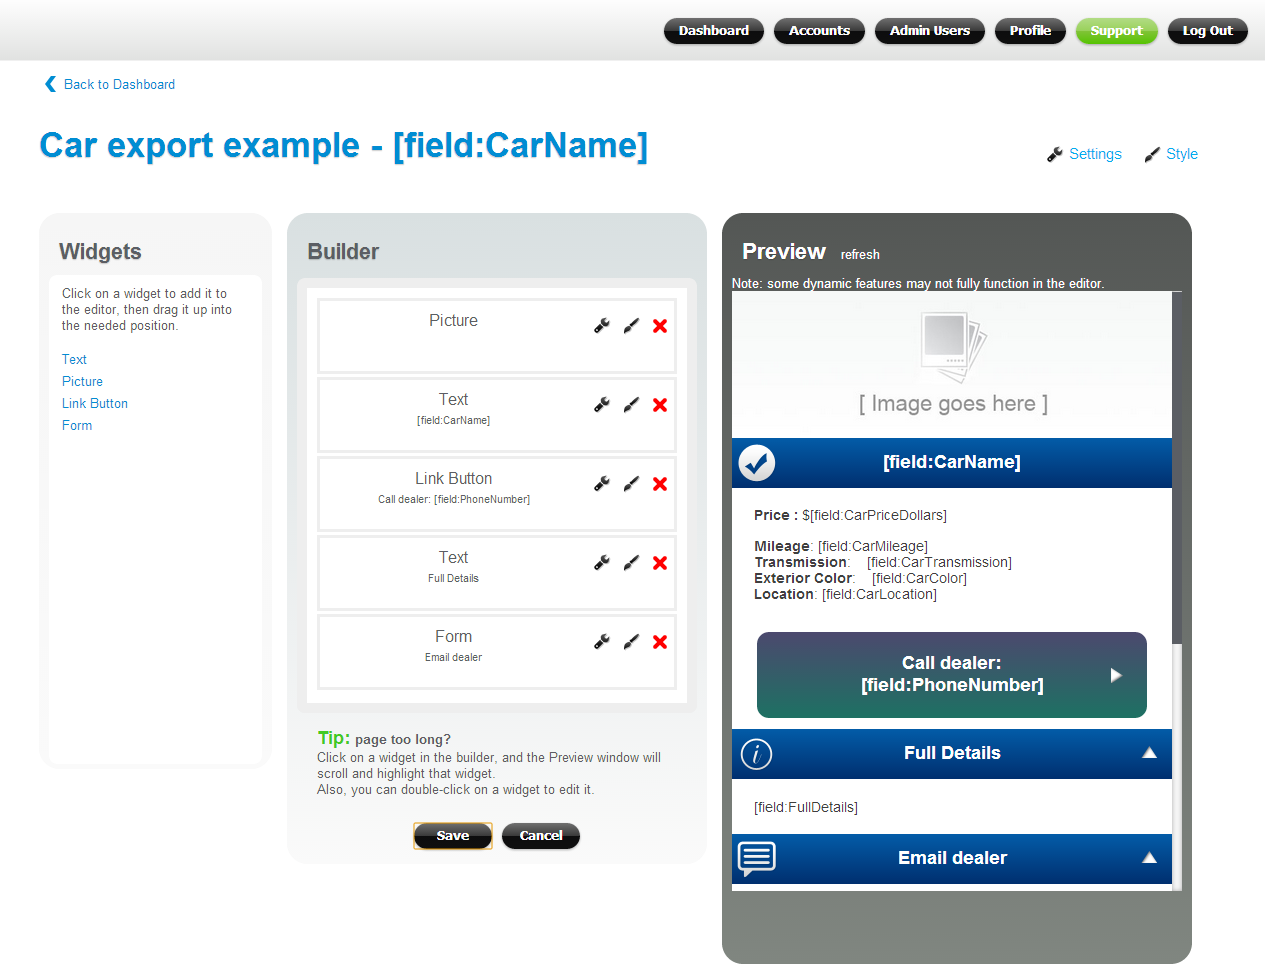
When you create an API Page Template, you would connect it to a Data Container and define what information will be "static" (the same content across all your API-generated pages), and what information will be dynamic (automatically populated via the API).
Once the Data Container and the API Page Template are created, you are ready to call the API.
Step one: call "GET /templates/containers?accountid={accountid}" method to get the list of existing data containers in this Premium account, and select the container id ("Id" property) for the data container you want to use. If you have the ability to create Premium accounts, you would also need to specify the id of the Premium account in "accountid" parameter.
Sample response:
{
  "Data": [
    {
      "Id": 2061,
      "Name": "Container for Auto Inventory"
    },
    {
      "Id": 2062,
      "Name": "Container for Parts"
    }
  ],
  "Success": true,
  "Messages": []
}
Step two: call "POST templates/containers/{containerid}/loaddataitems" method for loading data in the system. Use the container id from the last step as the "containerid" parameter.
Sample request:
{
   "Items":[
      {
         "Name":"TestCar1",
         "DomainId":24812,
         "PageTemplateId":1000,
         "Fields":[
            {
               "Value":"2012 Mercedes-Benz C63 AMG",
               "FieldName":"CarName"
            },
            {
               "Value":"25995",
               "FieldName":"CarPriceDollars"
            },
            {
               "Value":"16904",
               "FieldName":"CarMileage"
            },
            {
               "Value":"7-Speed Automatic",
               "FieldName":"CarTransmission"
            },
            {
               "Value":"Silver",
               "FieldName":"CarColor"
            },
            {
               "Value":"Brooklyn, NY",
               "FieldName":"CarLocation"
            },
            {
               "Value":"999-999-9999",
               "FieldName":"PhoneNumber"
            },
            {
               "Value":"All Wheel Drive, Power Steering, Brake Assist, Aluminum Wheels, ABS, \n4-Wheel Disc Brakes, Tires - Front Performance, Tires - Rear \nPerformance, other full specs about this car go here.\nExcellent condition, one owner!",
               "FieldName":"FullDetails"
            },
            {
               "Value":"http://upload.wikimedia.org/wikipedia/commons/8/8e/2012_Mercedes-Benz_C63_AMG_Car_Review_-_Flickr_-_NRMA_New_Cars.jpg",
               "FieldName":"CarImage"
            },
            {
               "Value":"bill@somecompany.com, bob@somecompany.com",
               "FieldName":"ContactFormSendToEmails"
            },
            {
               "Value":"car1",
               "FieldName":"Relative URL"
            }
         ]
      },
      {
         "Name":"TestCar2",
         "DomainId":24812,
         "PageTemplateId":1000,
         "Fields":[
            {
               "Value":"2011 Audi A6",
               "FieldName":"CarName"
            },
            {
               "Value":"29995",
               "FieldName":"CarPriceDollars"
            },
            {
               "Value":"26334",
               "FieldName":"CarMileage"
            },
            {
               "Value":"Automatic",
               "FieldName":"CarTransmission"
            },
            {
               "Value":"Silver",
               "FieldName":"CarColor"
            },
            {
               "Value":"Dallas, TX",
               "FieldName":"CarLocation"
            },
            {
               "Value":"888-888-8888",
               "FieldName":"PhoneNumber"
            },
            {
               "Value":"Fuel Consumption: City: 21 Mpg, Fuel Consumption: Highway: 30 Mpg, Remote Power Door Locks, Power Windows, Cruise Control, 4-Wheel Abs Brakes, Front Ventilated Disc Brakes|1St And 2Nd Row Curtain Head Airbags, Passenger Airbag|Side Airbag, Express Open/Close Glass Sunroof, Bluetooth Wireless Phone Connectivity",
               "FieldName":"FullDetails"
            },
            {
               "Value":"http://upload.wikimedia.org/wikipedia/commons/a/ae/2011_Audi_A6_-_NRMA_Drivers_Seat_-_Flickr_-_NRMA_New_Cars_%281%29.jpg",
               "FieldName":"CarImage"
            },
            {
               "Value":"bill@somecompany.com, bob@somecompany.com",
               "FieldName":"ContactFormSendToEmails"
            },
            {
               "Value":"car2",
               "FieldName":"Relative URL"
            }
         ]
      },
      {
         "Name":"TestCar3",
         "DomainId":24812,
         "PageTemplateId":1000,
         "Fields":[
            {
               "Value":"1994 Ford Capri",
               "FieldName":"CarName"
            },
            {
               "Value":"2.5",
               "FieldName":"CarPriceDollars"
            },
            {
               "Value":"186334",
               "FieldName":"CarMileage"
            },
            {
               "Value":"5 speed Manual",
               "FieldName":"CarTransmission"
            },
            {
               "Value":"Red",
               "FieldName":"CarColor"
            },
            {
               "Value":"Weatherford, TX",
               "FieldName":"CarLocation"
            },
            {
               "Value":"777-777-7777",
               "FieldName":"PhoneNumber"
            },
            {
               "Value":"2 doors 4 seat Convertible, Front Wheel Drive. The car is still in create condition, for sale by original owner. A great drive!",
               "FieldName":"FullDetails"
            },
            {
               "Value":"http://upload.wikimedia.org/wikipedia/commons/c/c2/Cars-redcapri-blackpool-amoswolfe.jpg",
               "FieldName":"CarImage"
            },
            {
               "Value":"bill@somecompany.com, bob@somecompany.com",
               "FieldName":"ContactFormSendToEmails"
            },
            {
               "Value":"car3",
               "FieldName":"Relative URL"
            }
         ]
      }
   ]
}
Sample response:
{
   "Data":{
      "ProcessedItemCount":3,
      "SuccessProcessedItemCount":3,
      "ProcessedWithErrorItemCount":0,
      "ItemIdArray":[
         2030,
         2031,
         2032
      ],
      "Errors":[]
   },
   "Success":true,
   "Messages":[]
}
Step three: call "POST templates/containers/{containerid}/generatepages" method for to generate pages for a data container. Use the container id from the last step as the "containerid" parameter. To generate pages for specific data items, specify the needed item ids in JSON (as shown below). Otherwise, pages for all items within a data container will be generated.
Sample request:
[
   {
      "ItemId":2030
   },
   {
      "ItemId":2031
   },
   {
      "ItemId":2032
   }
]
Sample response:
{
   "Data":{
      "JobId":"b5e8f953-24b5-4f29-82da-388cf44c3632"
   },
   "Success":true,
   "Messages":[]
}
Page generation operation is an asynchronous task. Call "GET templates/pagetemplates/getgeneratepagesstatus?jobid={jobid}" method to check the job status. Use the job id from the last step as the "jobid" parameter.
Sample response:
{
   "Data":{
      "Status":"Success",
      "Data":{
         "PageRegenerated":3,
         "Errors":[],
         "Warnings":[]
      }
   },
   "Success":true,
   "Messages":[]
}